How to Make the Framed X-Block Quilt
- Kanitta
- 6 days ago
- 3 min read
Updated: 3 days ago
This stunning quilt features a bold geometric design made up of twelve “X” shaped blocks, each framed by concentric lines that create depth and movement.

The quilt is constructed using square and log cabin-style piecing techniques, making it suitable for confident beginners and intermediate quilters.
With its modular block format, it's also a great project for using paper foundation piecing. Whether you're looking to make a throw, wall hanging, or a full-sized quilt, this pattern offers flexibility in size and layout.
Let’s dive in and bring this bold beauty to life—one X-block at a time!
The finished block measures 8" x 8"

Cutting for one block (4 units)

A = 1" x 4.5"
Blue = 4 patches
B = 1" x 4"
Blue = 4 patches
White = 4 patches
C = 1" x 3.5"
Blue = 4 patches
White = 4 patches
D = 1" x 3"
Blue = 4 patches
White = 4 patches
E = 1" x 2.5"
White = 4 patch
F = 2.5" x 2.5"
Blue = 4 patch
G = 1.25" x 1.25"
White = 8 patches
H = 1" x 1"
White = 16 patches
Unit Assembly
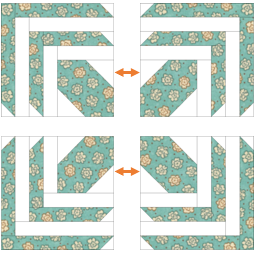
Start with the F square. Place two G squares on opposite corners and sew diagonally across each one. Trim the seams to about 1/4", then gently flip the G pieces open and press.

Take the blue A, B, C, and D rectangles and place an H square on the end corner of each one, following the layout in the diagram. Sew diagonally across the H squares, trim the seam allowance to about 1/4", then gently flip the H pieces open and press them flat.

Next, sew the white E rectangle to the unit, followed by the D. Press as you go to keep everything nice and neat.
Now, take the blue D and blue C units and sew them to the unit
Add the white C rectangle next, followed by the white B rectangle.
Then, sew on the blue B and blue A units.
Be sure to follow the layout in the diagram to keep everything in the right order. Press as you go to keep everything nice and neat.


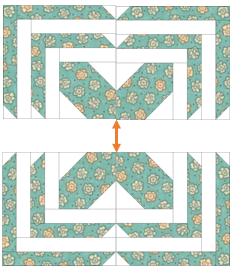
Make a total of 4 finished units. Once they’re done, lay them out in a row. Sew the units together to complete each row, then join the rows to finish your quilt block


This example quilt finishes at approximately 62" x 80", making it a cozy throw size—great for the couch, a bed topper, or a beautiful wall display

Quilt assembly
You’ll need 12 blocks in total for this quilt.
Sew 3 blocks together to make a row. Then, make 4 rows and join them together.
Adding Borders and Binding
To give your quilt a polished finish and bring everything together, we’ll add a simple border and binding:
Add the Border:Cut your border fabric into the following strips:– Side borders: 2 pieces, each 4" x 72"– Top and bottom borders: 2 pieces, each 4" x 62"
Start by sewing the side borders to the quilt top, one on each side. Then, add the top and bottom borders. Press all the seams outward for a smooth finish.
Quilt as Desired: Layer your quilt top with batting and backing, then quilt it using your preferred method—whether that’s hand quilting, machine quilting, or sending it to a longarm quilter.
Bind the Edges: Cut binding strips, join them as needed, and press them in half lengthwise. Sew the binding around the edges of your quilt, and finish it off by hand or machine stitching the binding to the back.
You can watch the step-by-step tutorial on how to make a block here. It’s a great way to follow along visually and see how each part comes together!

Comentários